One mantra we try to live by at Nestr is that we don't pretend to know how to best run your organisation. We are here to support any and all experimentation in persuit of your organisational purpose.
In that light, we offer our Automations app. It allows you to automate many different business processes relieving you of the manual work. Here are a few examples on how you can use it:
- Support new members of your organisation through an automated onboarding flow.
- Invite everyone in your organisation (or a business unit/circle) to your queartery feedback cycle.
- Configure a training where people are taken through a course for x weeks/months.
- Trigger your configured AI bot to assist a team when they start a new meeting.
- Create a set of todo's for a user when they are assigned to a new role.
- Whatever else you can come up with...
How to set it up
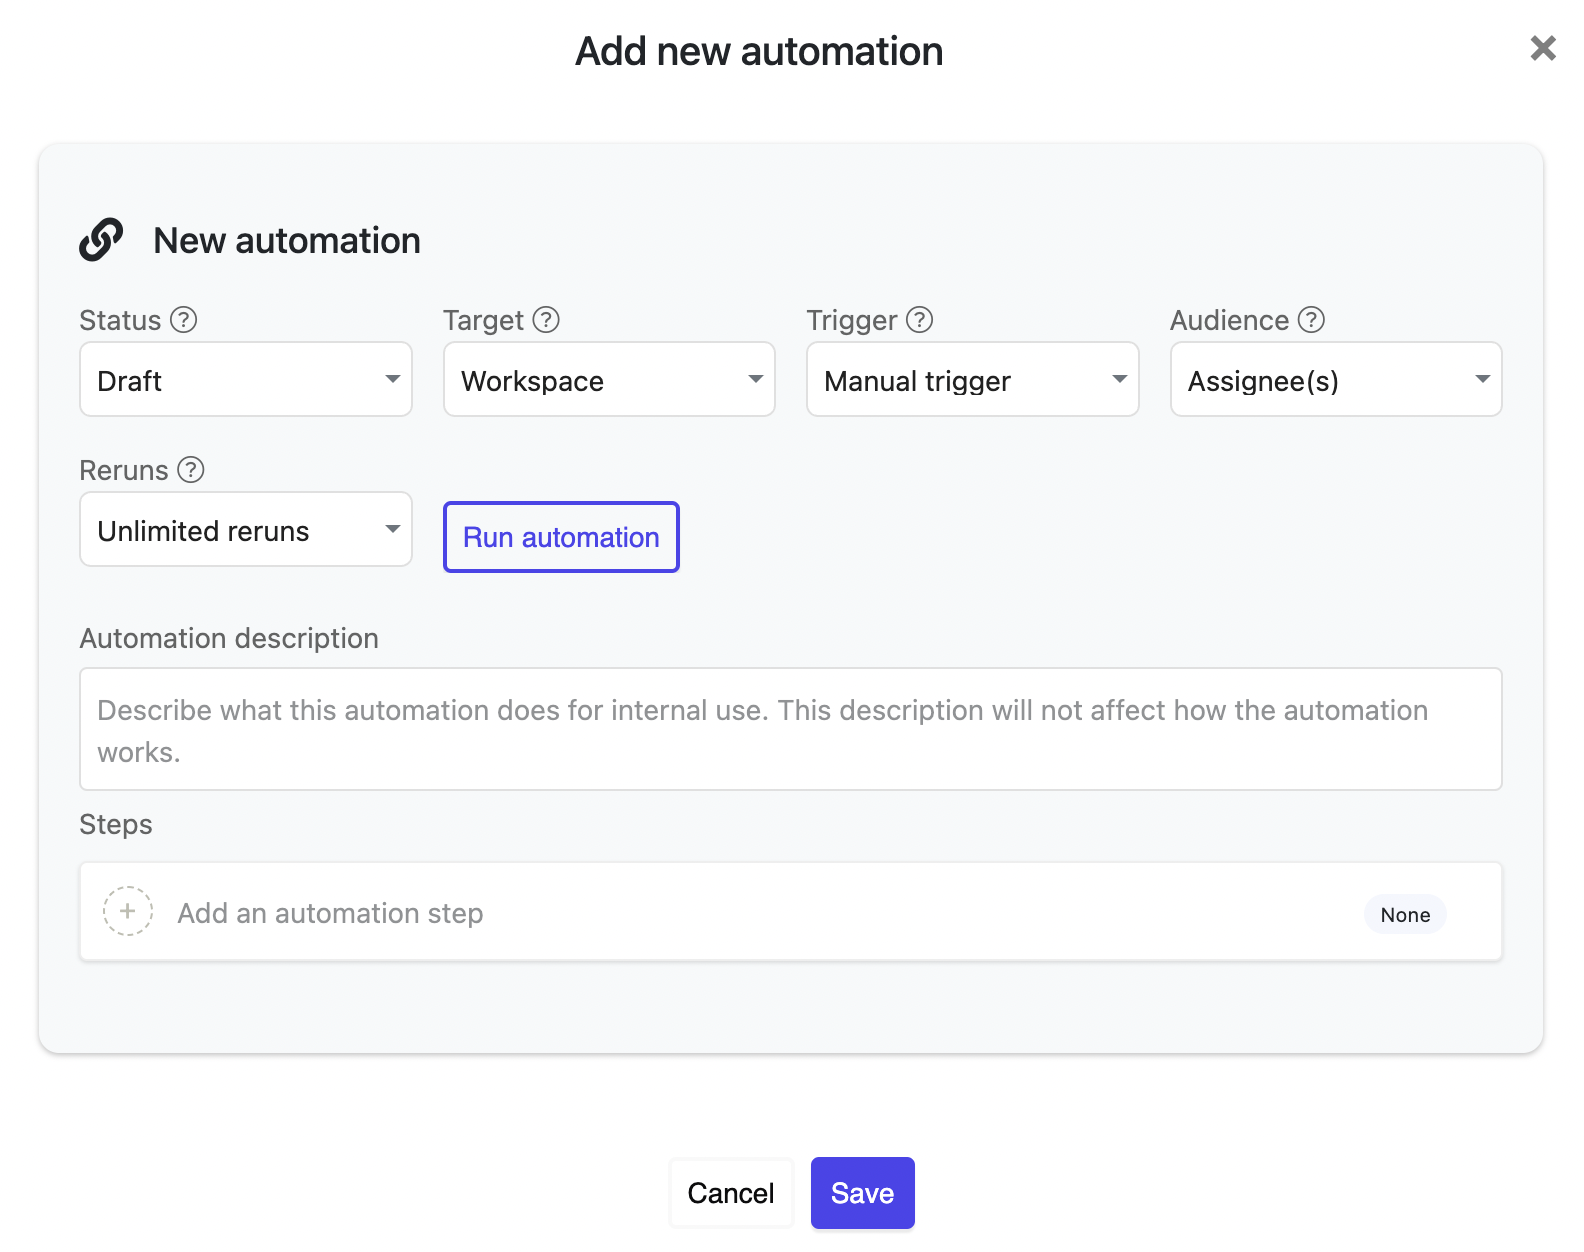
At current, only workspace admins can configure automations. You can enable it on 'Applications' tab of your workspace. Once enabled, you can create new automations to your workspace. You will see the following screen to start with

Let's run trough the automation options:
- Status: Is the automation enabled or not? Default this is set to draft. When you are ready, you can set this to active. You can pause an automation at any time.
- Target: What will be targeted by this automation?
- Workspace (default): Target the entire workspace.
- Specific item: This will allow you to target a single circle, project, todo or anything you have defined in your workspace.
- All items with specific label: This allows you, for example, to target all circles or roles in your workspace, or all projects with a specific label.
- Trigger: What will trigger the automation to run?
- Manual trigger (default): , meaning you can start it yourself by clicking a button.
- Date/time: Start the trigger at a specified time with optionally re-runs at a specified interval.
- User assign: Run the automation when a user is assigned to the target. When the target is 'Workspace' it means a new member in the workspace. When the target is a specific item or a certain labled item, it means when a user is assigned to such an item.
- Created: This is only available when the target is 'All items with specific label' and will trigger when such an item is created.
- Event started: This is only available when the target is 'All items with specific label' and will trigger when an event starts. This is specifically useful for meetings that are scheduled to start at a certain time. If this trigger is applied to an event that does not have a start date/time, it will trigger at creation.
- Audience: Will this automation have an audinece or not?
- Assignees (default): This automation will target all assignees of the target.
- No audience: This automation will not have an audience. This is usefull when your automation is not meant to interact with users. For example when you want to create a set of todo's in a project when labeled with a certain label.
- Reruns: How often should this automation be re-run?
- Unlimited: This automation may be rerun as often as it is triggered. (eg. Your quesrtely feedback invitation flow)
- Once per target: This automation should only run once per target. (eg. Adding a set to todo's to a project)
- Once per user: This automation should only run once per user. (eg. An onboarding flow into the organisation)
- Once per target/user: This automation should only run once per target user combination. (eg. An onboarding flow into a new role)
Define what the Automation should do
Once you have configured what the automation will target, how it is triggered and who the audience is, you can define what it should do in the 'Steps' section. Click the '+ Add an automation step', give teh step an initial name and hit enter.
When you created your first step, click on it to open it. There you will have one drop down to set the step action with the following options:
- Wait: Wait for a certain amount of time from the moment the step is triggered. This can be used at the start of your automation or between steps. Usefull for example when you setup an onboarding flow where you want to email a user every week for 6 weeks.
- Email: Email your audience. Here you can set the subject and content of your email. In both the content and the subject you may use template variables which Nestr will change at runtime. An example is {{audienceName}} which will use the name of the user you are emailing. A full list of template options is available below. Note that we will only email users with verified email addresses or users with an emailaddress on a verified domain that has been associated with your workspace.
- Post: Post a message in the Nestr feed of the target. If the target is a circle, it will add a message to the feed of that circle. If the target is a project, it will add a comment to that project. You may choose to mention your audience which will add a mention of your audience in the post notifying them of the post. You can also optionally make the post private to only those that are mentioned. In a post you can also use the target template variables but not the audience template variables as we'll only make one post per run which might have more than one user.
- Create item (coming soon): Create a new item in your target. For example, create a set of projects for any new role created or a todo when a certain label is added to a project.
Available template options
When sending out an email, posting a message or creating new items, you may use the following template variables. Nestr will replace these before emailing, posting or creating.
- {{targetTitle}}: The title of the target. eg. the name of the workspace, circle or project.
- {{targetUrl}}: The url of the target.
When the target is a circle, these template options are available as well:
- {{targetAboutUrl}}: Url to the circle overview tab
- {{targetRolesUrl}}: Url to the circle roles page
- {{targetFeedUrl}}: Url to the circle feed
- {{targetFeedbackUrl}}: Url to the circle feedback page (if the feedback app is enabled)
- {{targetGoalsUrl}}: Url to the circle OKR page (if the OKR app is enabled)
- {{targetMeetingsUrl}}: Url to the circle meetings page
- {{targetProjectsUrl}}: Url to the circle projects page
- {{targetTodosUrl}}: Url to the circle todos page
When your automation has a target, the follwoign template options are available as well.
- {{audienceName}}: The first name of the user
- {{audienceFullName}}: The full name of the user
- {{audienceEmail}}: The email of the user
- {{audienceProfileUrl}}: The url to the users profile page.
- {{audienceAccountSettingsUrl}}: The url to the users account settings page.
- {{audienceAccountNotificationSettingsUrl}}: The url to the users notifications settings page.
- {{audienceRolesUrl}}: The url to the users public roles page.
- {{audienceFeedbackUrl}}: The url to the users feedback page. For the user themselves, where they see all feedback and can request/give feedback. For others, where all feedback that is workspace public can be reviewed.
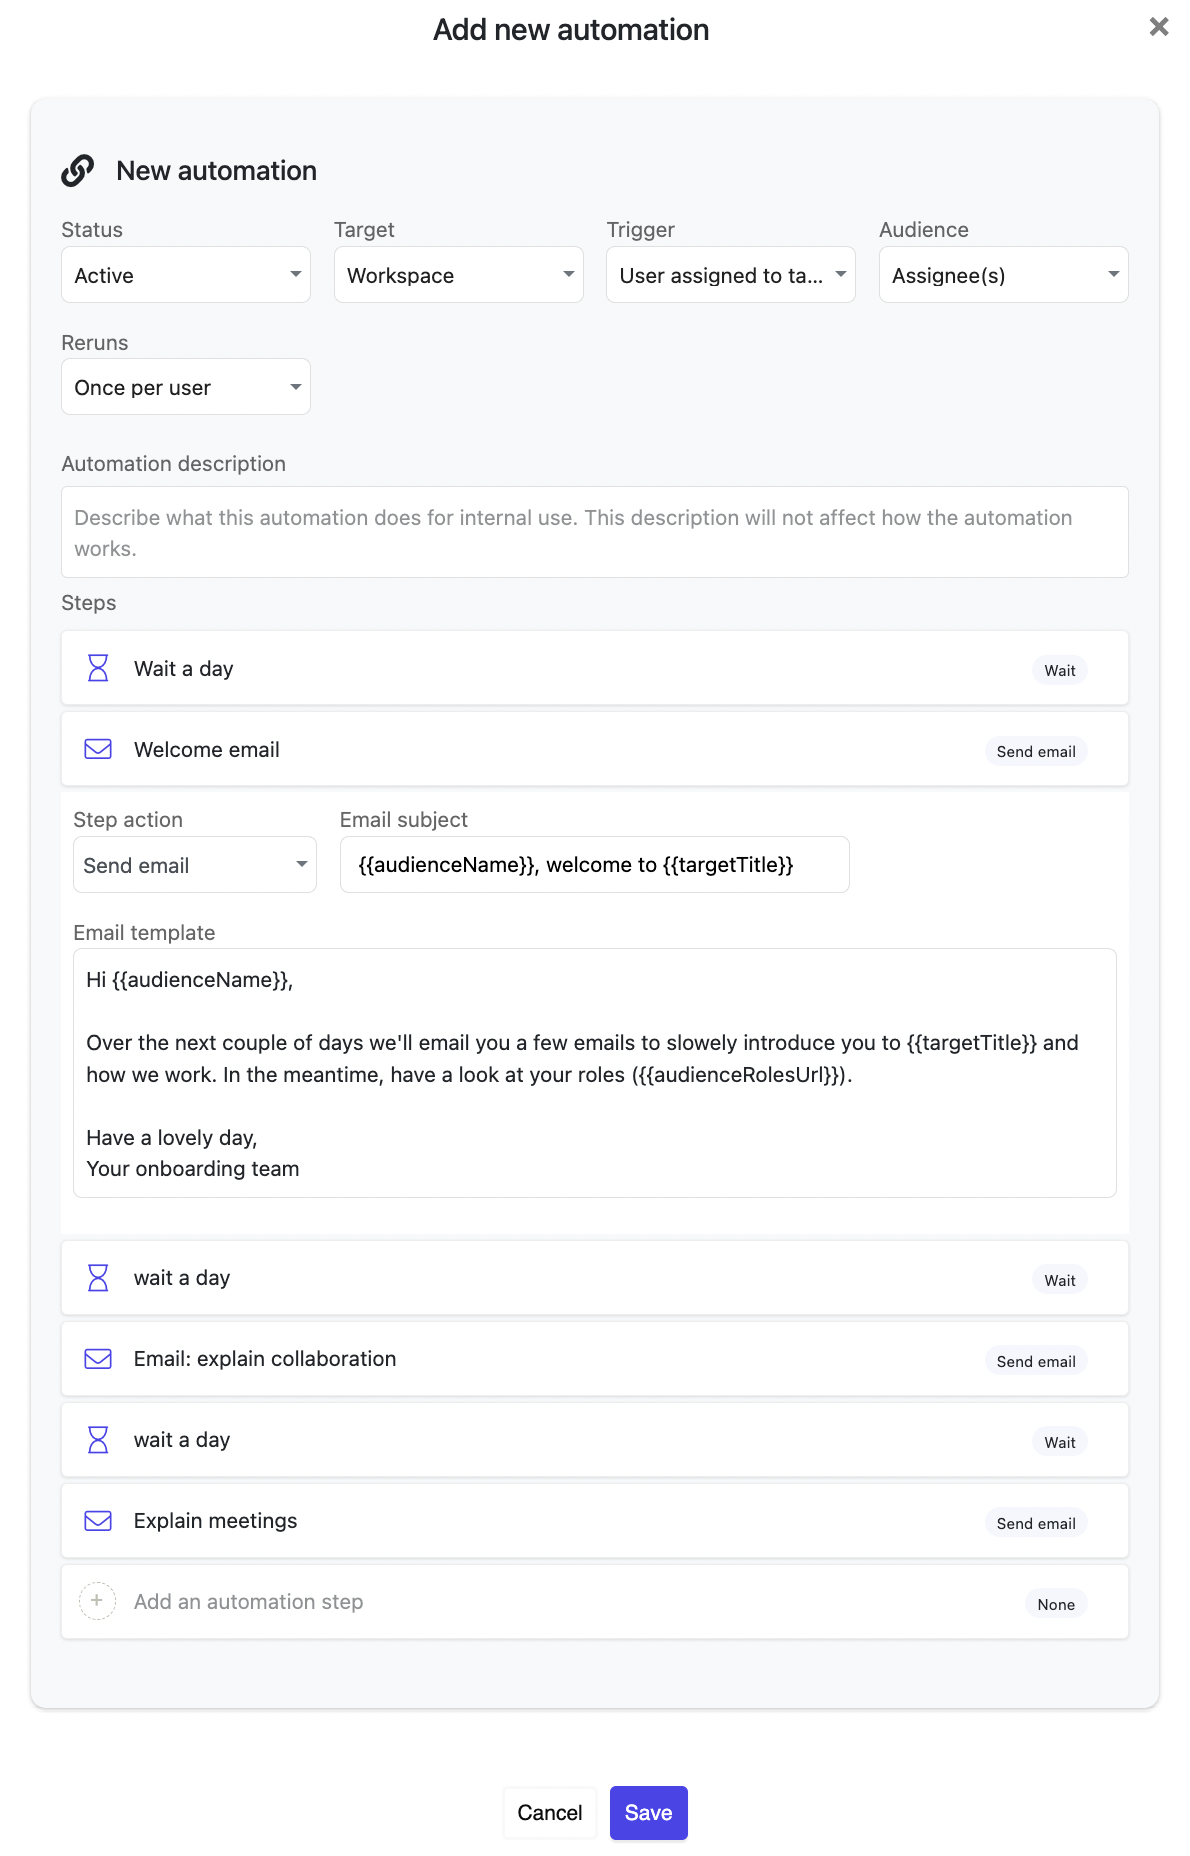
When you tie it alltogether, a fully configured automation could look something like this:
